How to set up a home server from scratch
Setting up your own personal server offers several advantages, especially when working from home, playing online games, or accessing your files and content across different devices. The best part is that it’s not as technically challenging or costly as it may first appear. What’s more, you might already have everything you need to get started.
This guide will break down what you need to know about home servers, including what they are, how they’re used, the benefits they bring, and, most importantly, how to set them up on the major operating systems (OSs).
What is a home server, and what does it do?
In simple terms, a server is either a device or program that provides services, resources, or data to one or more devices over a network.
Many servers are owned and operated by businesses and set up in professional workplaces or public spaces. A home server, however, can be set up and run from the comfort of your own home, providing helpful services for your various home devices, such as computers or phones.
Is it worth setting up a home server?
Absolutely. There are numerous uses and benefits of setting up a home server, which we’ll delve into in further detail below. They can make your life easier, whether you’re working, transferring files, playing online games, or setting up smart home devices.
The benefits are most relevant for those who work from home, but even casual users can enjoy the convenience, efficiency, and unique advantages a home server provides.
Home server vs. NAS: What’s the difference?
NAS, or network attached storage, is a device designed to assist primarily with file storage and sharing, allowing you to easily access and store files from a range of different connected devices.
Home servers, meanwhile, are more complex than that. They can carry out the same basic functions of NAS devices but typically have much more sophisticated hardware since they’re often made from computers. This allows servers to be used for much more than just file storage, since they can run OS and desktop applications.
Can you turn a regular PC into a home server?
You certainly can. In fact, one of the most common ways people set up their own home servers is by repurposing old PCs they no longer use. You don’t have to buy or build a specialized device; even a relatively old and basic computer can be configured into an efficient home server.
What can you use a home server for?
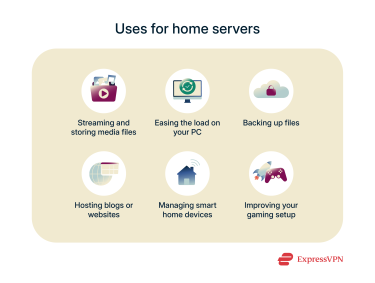 Many people like having home servers to make it easier to store and access their favorite files on different devices. However, home servers have many more uses and benefits than that. Here are just some of the ways you can use them.
Stream and store media from a central location
Most people who don’t have home servers end up storing lots of different media files, like photos, videos, and audio, across their different devices.
If they want to view or stream something, they have to find the device it’s on, find a way to transfer it over to a different device, and wait for the transfer to finish. That can be tedious and time-consuming.
With a home server, it’s much easier. You can store all your media on the server itself and access it instantly on any of your devices.
Reduce power usage and load on your main PC
Streaming media files uses a lot of system resources, and even high-end computers can slow down and perform worse when you’ve got media files open and other apps running at the same time.
A home server helps to ease the load on your primary PC or device. You can keep running other apps on your PC while letting the server take care of media streaming.
Back up your files automatically
It’s so important to back up your most important files and precious digital memories, like family photos and videos. Without backups, you could lose everything if your device gets damaged or infected with malware, for example.
Unfortunately, many people simply forget to make backups or lack the tools to do so.
Again, a home server is the solution. It can back up all the data from your various devices, so you always have extra copies of your most significant files. You can even configure your home server to create regular automatic backups for your convenience.
Host your own website or blog
If you’ve ever dreamed of setting up your own website or blog but have been put off by server and hosting costs, a home server might be the answer.
It most likely won’t be able to handle huge amounts of traffic, because your home internet connection may not provide the necessary bandwidth and upload speeds needed to support large numbers of connections. There can also be conflicts in web hosting with dynamic IP addresses of home servers. However, it should still be sufficient for a simple, small-scale site.
Plus, since you own and operate the server, you’ll have total control over your website’s management and won’t have to pay for professional hosting services.
Set up home automation and smart devices
If you’re heavily invested in smart home devices, like smart thermostats, lights, security systems, and appliances, a home server will make it easier to manage and optimize them.
You can essentially use your home server as a smart home hub, controlling your various connected devices and improving your home’s efficiency in the process.
Create a private gaming server
For online gamers, a home server can be a game-changer. You can host multiplayer sessions on your own private server, which may provide superior performance, speed, and fewer connection issues compared to the servers offered in-game.
If you find you’re getting lots of annoying heat and fan sounds with your home gaming setup, a home server can address this, too. You can run the games on your server far away from you, and the game will still render on your computer’s display.
Running games on your own server also gives you more control over the overall gaming experience. You can, for example, control which players have access to your server, as well as set up your own mods or custom scripts, choose how many players can join your online sessions, and so on.
Preliminary steps to build a home server
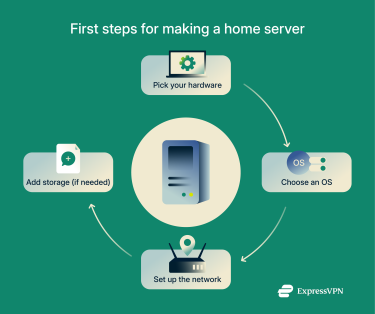 Now you know the benefits, let’s take a look at how to build your own server, beginning with the preliminary steps like choosing your hardware and OS.
Choose the right hardware
You’ll need a piece of hardware to use as your server. Many people repurpose an old computer they no longer need, and even decade-old PCs should still be powerful enough to serve as home servers, though you may want to make some minor upgrades. If you don’t have an old computer, you could buy a used one, build one from parts, or buy a simpler device like a NAS.
Pick your operating system (Windows, Linux, or MacOS)
Next, select which of the three main OSs you wish to use for your server. Those who have only or mostly used Windows or macOS in the past might prefer to stick with those systems due to familiarity. However, Linux distributions like Ubuntu and Debian are arguably the best, since they’re free, open-source, and generally quite stable and reliable.
You could even try combining a couple of OSs, for example, running one virtual machine on Windows and one with a Linux distro. This enables you to switch between systems whenever you like.
Set up your network and assign a static IP
You’ll most likely want to set up a static IP for your home server so that you can reach it even when you’re away from the home network. To do this, you’ll have to contact your internet service provider (ISP), as they’ll be able to assign you a static IP (sometimes for a small fee).
You can then configure the network settings for your server accordingly, though the exact steps to do this can vary greatly depending on which OS you’re working with.
Add storage and configure drives
If you plan to store a lot of files on your home server, you’ll need to ensure it has sufficient storage. An old PC might have a 500GB hard drive, for example, but you might need much more than that for your various photos, videos, and other files. If so, add some additional drives to your device and set them up in accordance with the manufacturer’s instructions.
How to set up your home server
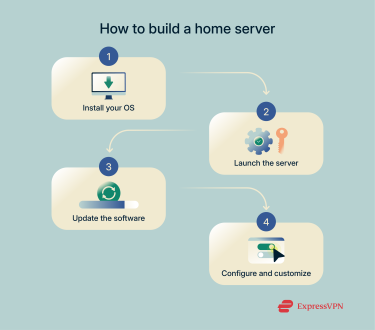 The exact process of setting up a home server varies massively from device to device and OS to OS. As such, you may have to do some additional research or seek help from relevant communities and experts in regard to the exact steps you need to follow. With that said, here are some general steps to help you through the process.
Step 1: Install and configure your OS
Once you’ve selected the device you want to use for your home server, you’ll need to install and configure your chosen OS on that device. You can download the relevant OS files from trusted, official sources online, install them, and follow the on-screen instructions to set them up.
You’ll also need to install some home server software, with many different options to choose from. Popular choices include YunoHost, which is a lightweight and relatively beginner-friendly application, and UmbrelOS, which offers a great range of apps for media streaming, file storage, productivity, and more.
Step 2: Add your SSH key and launch the server
If you want to be able to access your server remotely, you’ll need to add a Secure Shell (SSH) key. Again, the way you generate and add your key will vary depending on your chosen OS and server software. Look up the relevant steps for your specific setup and introduce your key to the server dashboard, then launch your server.
Step 3: Log in remotely and run updates
With your server launched, you’ll be able to log into it either remotely or locally, depending on your setup. You can then run all relevant updates for your various pieces of server software to ensure your server is performing at peak capacity, with the latest bug fixes and security patches for your convenience and protection.
Step 4: Configure users, firewall, and services
Once your server is up and running, you can use the various pieces of server software to configure it to your liking. You can set up access controls, security measures like firewalls, and added services such as file storage, media streaming, or gaming servers, as needed.
Keep your home server secure and stable
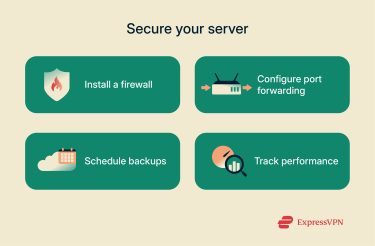 To prevent unauthorized access to your server and the files stored on it, you’ll want to ensure it’s secure, private, and stable.
Set up a firewall and manage open ports
It’s likely that the device you use as your home server will already have some sort of firewall technology built in. You may need to configure this via your server software, or it might activate automatically. Look into the network and port forwarding settings, too, to ensure you can access your server from different devices without leaving it open to infiltration.
Schedule regular backups
As touched on earlier, a home server can be an excellent device for backing up your files, reducing the risk of precious photos, videos, and documents getting lost. However, it’s worth configuring your server to back up all its data automatically on a schedule so you don’t have to make manual backups yourself.
Monitor uptime and resource usage
Use relevant tools, such as home server monitoring mobile apps, to track your server’s performance. See how many of the system’s resources it uses to ensure you’re not pushing it too hard, and keep an eye on uptime figures, too. If your server repeatedly goes down or has other technical issues, you may need to make some software adjustments or hardware improvements.
Tips for using the command line
You may need to use the command line to set up and manage your server. Here are some helpful tools to simplify that process.
Use aliases and bash history to speed up tasks
Command line aliases are basically like shortcuts for commands or file names. Use them to save time when typing out tasks you tend to do often. If you’re on Linux, you can also access common commands via the bash history feature, which lets you quickly view, modify, delete, or deploy shortcuts and commands as needed.
Learn key Linux commands for maintenance
If you’re using Linux for your home server, it’s worth taking the time to learn some common maintenance commands that’ll save you time when managing and monitoring your server. You can find helpful lists of go-to commands online and note down those that are most relevant for you.
Considering a virtual private server instead?
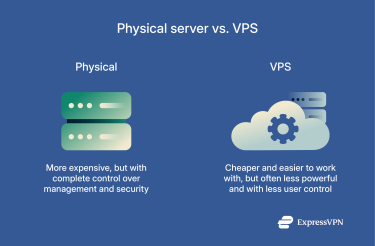 You don’t necessarily need a physical home server; you can set up a virtual private server (VPS) instead.
When to choose VPS over a physical server
VPS servers are cheaper and easier to work with, as you won’t have to worry about the technical backend side of their operations. You can just launch your server with the OS and applications you want and start using it.
As such, a VPS might be a good choice for those who are either on a budget or those who consider themselves beginners in this field and worry about home server management being too technical and confusing.
How to choose a VPS provider
To pick the right VPS provider, consider:
- Resources: Think about how much RAM, storage, and data transfer volume you’ll need to allow you to use your server the way you want.
- Scalability: Think ahead to the future and how your needs might grow or change in the months to come. You may need a highly scalable VPS to suit your future plans.
- Cost: Find a price plan that fits your budget. Think about payment frequency, too. It’s often better value to pay annually or even sign up for a multi-year plan to lock in a cheaper rate.
- Managed or unmanaged: Unmanaged servers are cheaper, but you’ll have to do all the work in terms of installing apps and updating them. Managed servers cost more but are much more beginner-friendly.
- OS: Linux is almost always the better option, due to its lower costs and superior stability. However, you might still want Windows if you intend on running Windows-exclusive applications.
- Control panel: To manage your server, you can opt for the popular cPanel software, which is generally regarded as the easiest to work with, or a different application. Note that cPanel often comes with pricey licensing fees, so you may want a cheaper alternative.
FAQ: Common questions about setting up a home server from scratch
What does a home server do?
A home server provides a centralized space for you to store files, host your own site or blog, host multiplayer games, back up files, manage smart devices, and more.
Is it worth setting up a home server?
Definitely, and many people will appreciate the benefits of a home server in terms of making their day-to-day computing more convenient, accessible, and faster. They’re great for those who work at home, as well as those who want a safe and centralized space to store and stream media.
What is the difference between a NAS and a home server?
Network attached storage (NAS) can be configured to be a home server, but it’s mainly designed just for file storage and sharing. Home servers, meanwhile, typically have more functions and features, along with more complex technology.
Can I use my PC as a home server?
You can use a PC you no longer need as a home server, yes, but not your main PC, as once a PC has been transformed into a server, you won’t be able to use it for other everyday computing tasks.
Take the first step to protect yourself online. Try ExpressVPN risk-free.
Get ExpressVPN


