What is my DNS? How to check and find your DNS server


When you want to access a website or online platform, you type the address into your internet browser, like “www.example.com.” But have you ever wondered how your computer is able to access that specific site? It’s all thanks to the power of the Domain Name System (DNS).
Knowing how DNS works and how to find, check, and change DNS settings is important for optimizing and securing your online connections. In this guide, we’ll look at how DNS works, why it matters, and how you can find your DNS server on different devices.
What is DNS?
As explained above, DNS stands for Domain Name System. An easy way to think of DNS is as the “phonebook” of the internet. It functions like a directory, translating website addresses into numerical IP addresses, which are what computers actually use to communicate with one another and direct users to the sites they want to visit.
Why is DNS important for your internet connection?
If DNS didn’t exist, you wouldn’t be able to type website addresses like “www.example.com” into your browser to access websites. Instead, you’d have to type numerical IP addresses instead, which would be a lot more complicated. In other words, DNS makes the internet much more user-friendly for people all over the world.
It’s also worth noting that DNS servers and settings can directly impact your online experience in multiple ways.
Some DNS servers are faster than others or have built-in security and privacy features to help you stay safe. Others are weaker, slower, and more prone to causing network issues or privacy vulnerabilities, like DNS leaks, which occur when others can see the sites you’re trying to visit, even with a VPN.
How does DNS work?
Every time you visit a website on any device, whether on a computer, laptop, or phone, you use DNS.
Here’s a quick step-by-step breakdown of how it works:
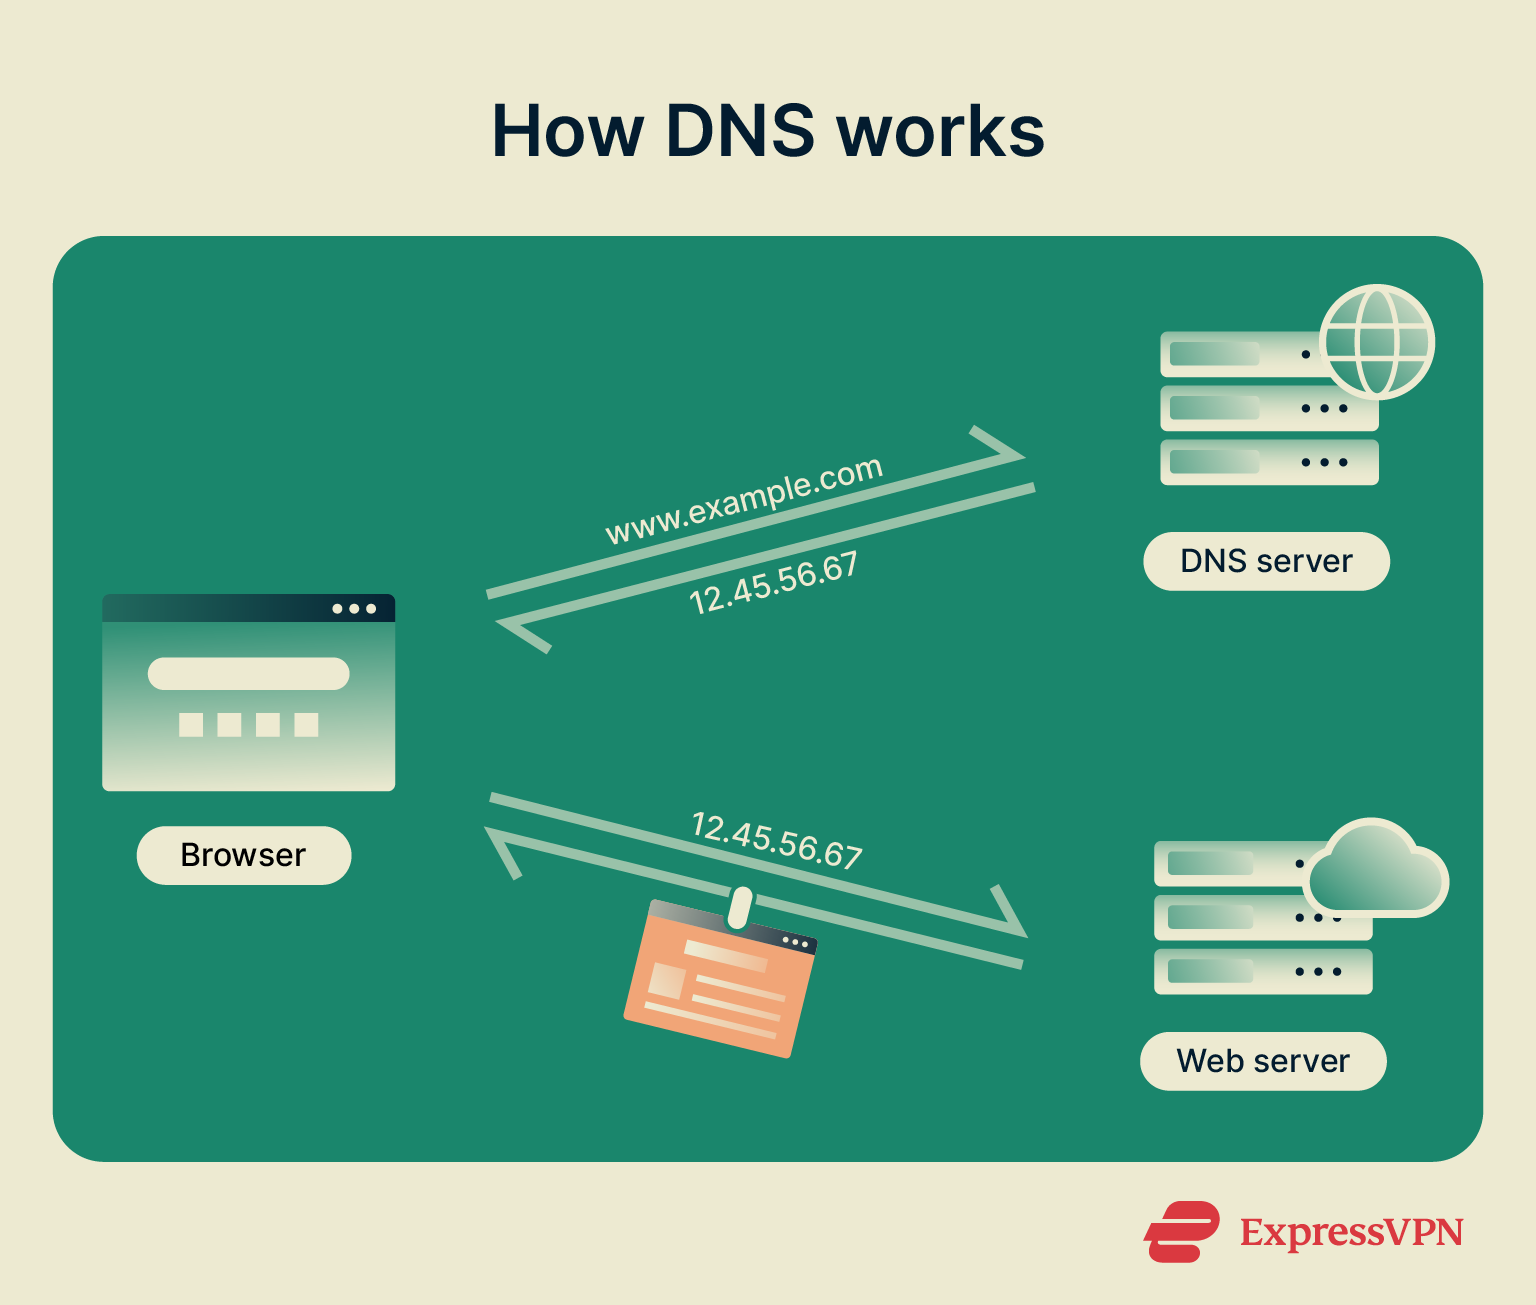
- First, you type a domain name (website address) into your browser and hit the Enter or Go button to access that site.
- Your device then sends a request to your DNS server, which is, by default, operated by your internet service provider (ISP). This request essentially asks the DNS server to “translate” the text-based web address into the appropriate numerical IP address.
- Once the DNS server finds the IP address, it sends it back to your device, which uses that information to connect to the correct website’s server. DNS responses are often cached locally or by your ISP to improve speed, so the next time you visit the same website, your device can skip the lookup process and connect more quickly.
What are the main components of DNS?
The core components of DNS are:
- Recursive resolvers: These are the first servers that your device will contact when trying to identify an IP address.
- Root servers: These are additional DNS servers. They don’t actually store any domain information themselves but instead serve to redirect your request to the right top-level domain (TLD) server.
- TLD servers: These are servers that are assigned to specific top-level domains (.com, .us, etc.) and direct the request to the appropriate authoritative server.
- Authoritative servers: These are the servers that actually contain the necessary DNS records and IP addresses of different websites.
How does DNS translate domain names to IP addresses?
Now that we’ve reviewed the main components of the DNS, it will be much easier to understand how DNS servers find the right IP address for each request they receive:
- Cache check: First, your device and local DNS resolver check their caches to see if they already have a recent answer. If they do, the IP address is returned immediately.
- Recursive resolution: If the answer isn’t cached, the request goes to a recursive DNS resolver.
- Root server: The resolver contacts a root DNS server, which responds with the location of the appropriate TLD server (for example, one handling “.com” domains).
- TLD server: Next, the resolver contacts the TLD server, which returns the address of the authoritative server for the specific domain.
- Authoritative server: Finally, the resolver queries the authoritative DNS server, which holds the domain’s actual DNS records (like its IP address). The IP address is sent back through the resolver to your device, allowing it to connect to the website.
While this may seem like a drawn-out process, it all usually happens in a mere fraction of a second, allowing you to hop from site to site quickly and conveniently.
Common misconceptions about DNS
- “DNS is just for websites.” Not true. DNS also supports other services, such as email platforms, web applications, and voice over internet protocol (VoIP) services.
- “DNS records are permanent.” Not necessarily. DNS records may be updated and changed over time, as needed.
- “DNS is a secure technology.” Sadly not. There are ways for hackers to exploit DNS technology, such as DNS spoofing (cache poisoning), DNS hijacking, and man-in-the-middle (MITM) attacks.
How to find your DNS server on any device
You can find your DNS server at any time, on any device, and it’s usually quite a simple process. Let’s take a look at how it’s done on Windows, Mac, mobile, and more.
Find your DNS server on Windows
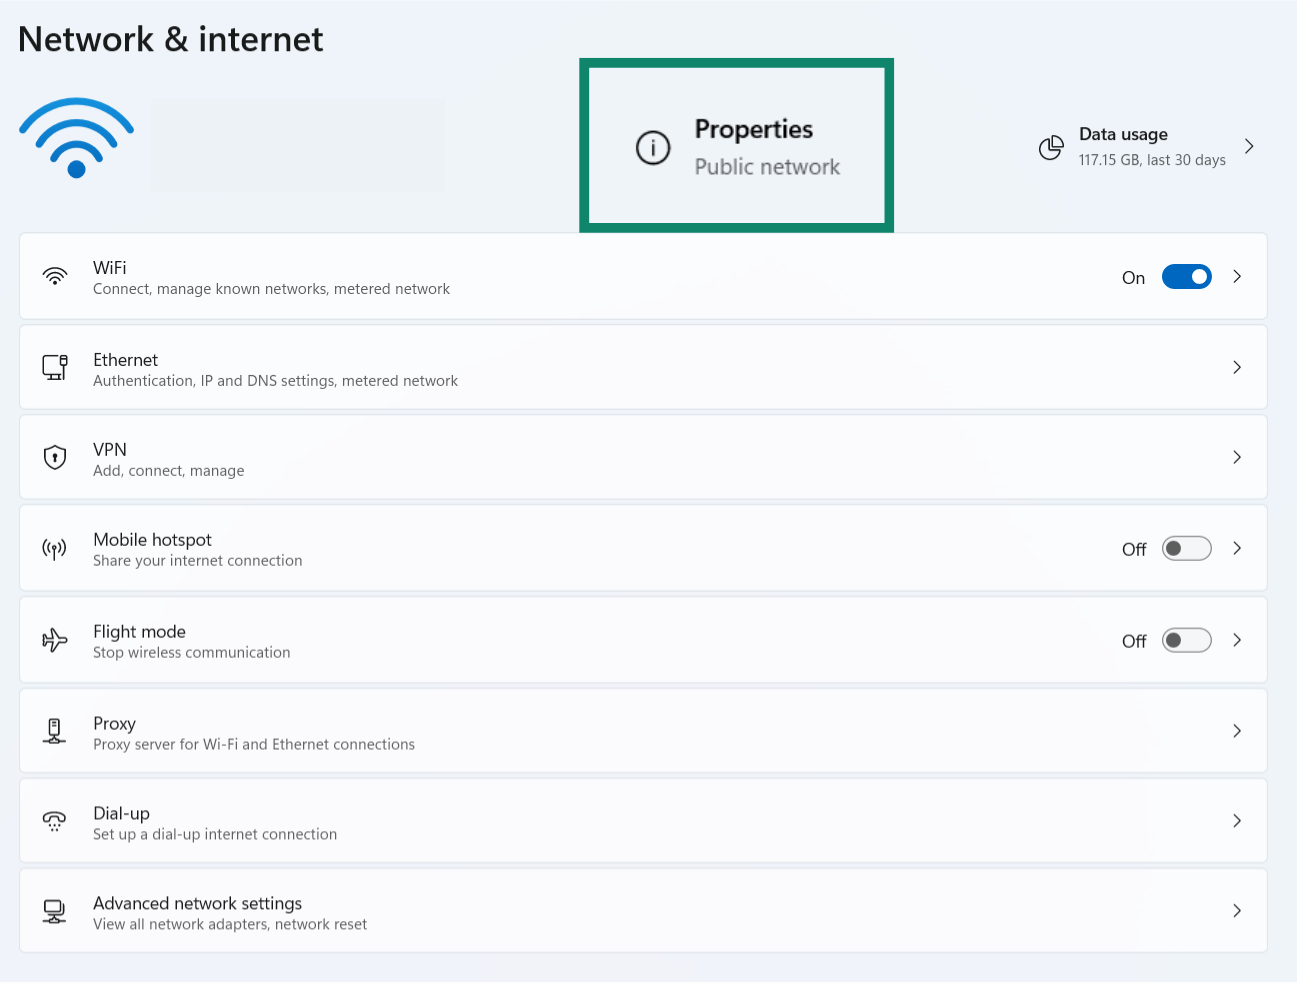
- Access the Settings menu by pressing the Windows and I keys together. Then click on Network & internet.
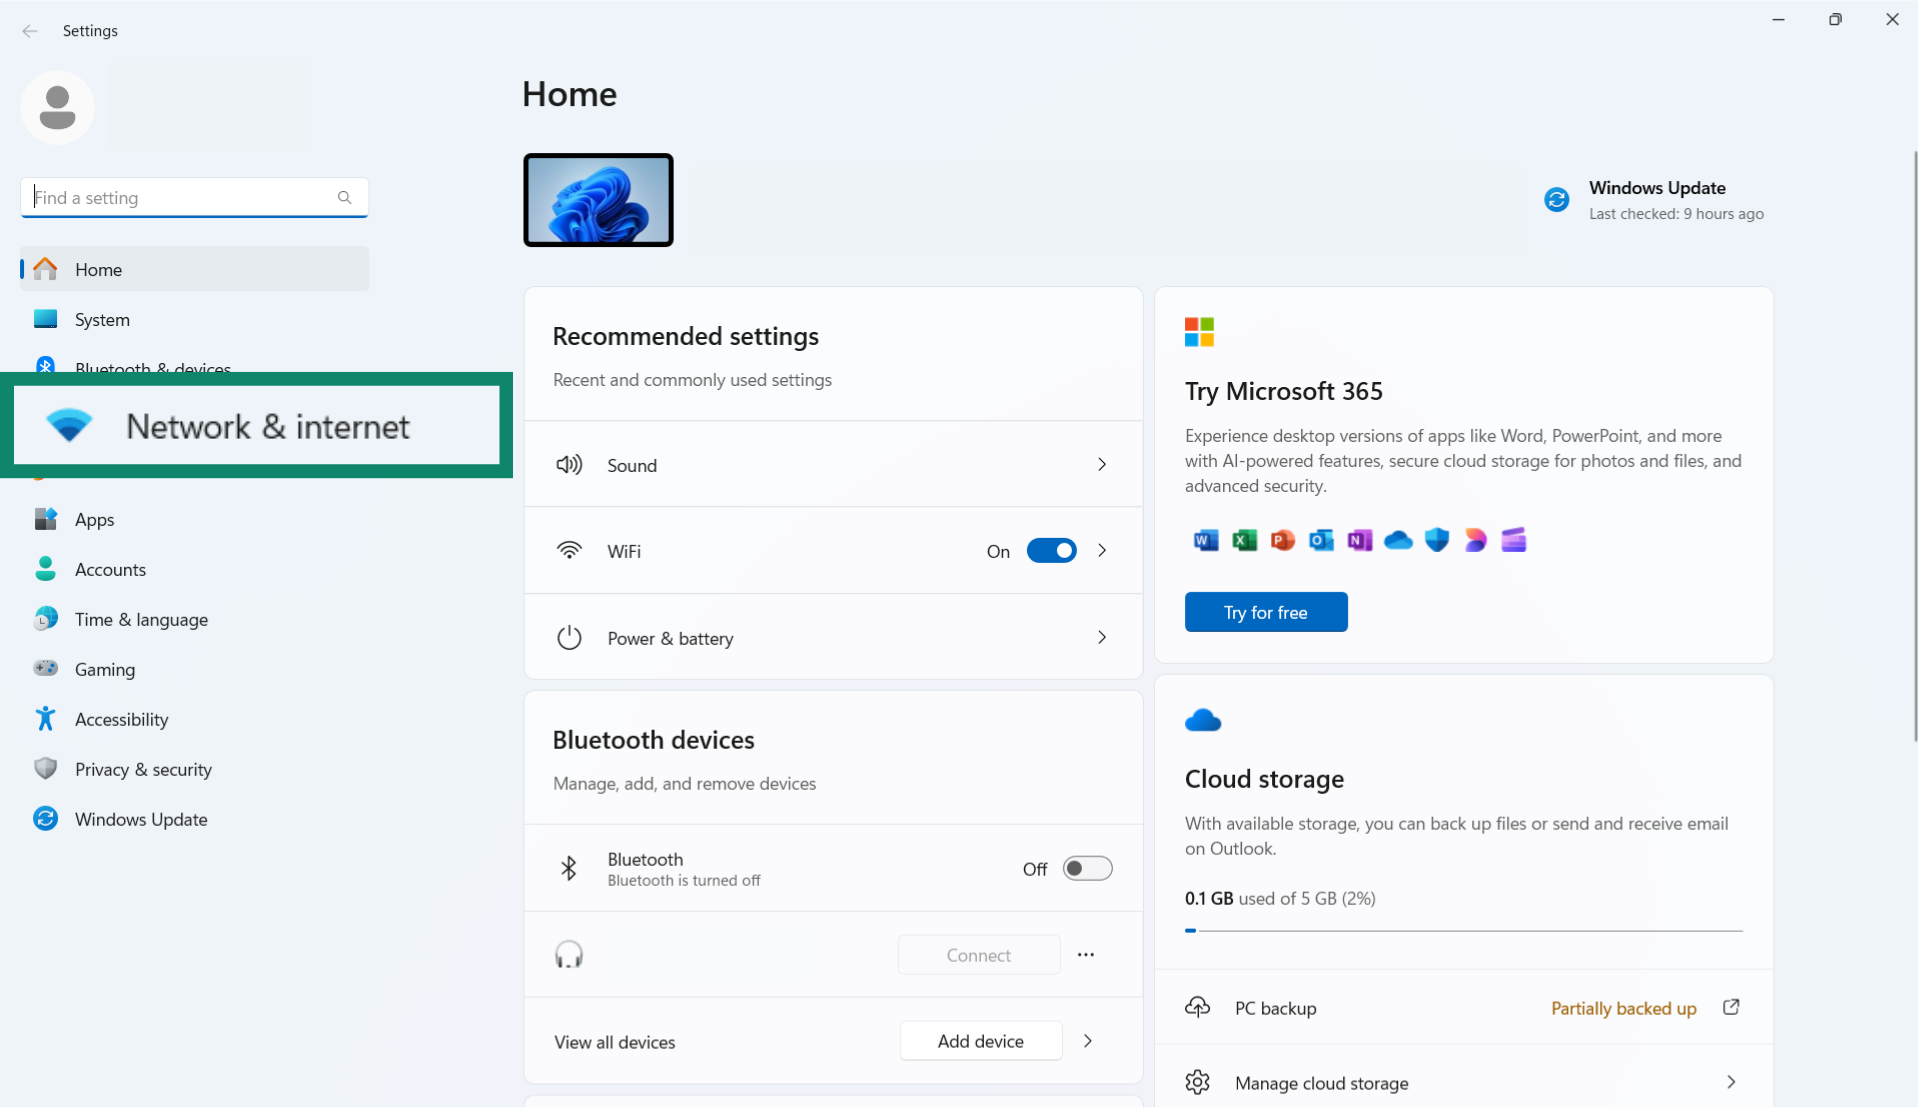
- Next to your network name, click on Properties.
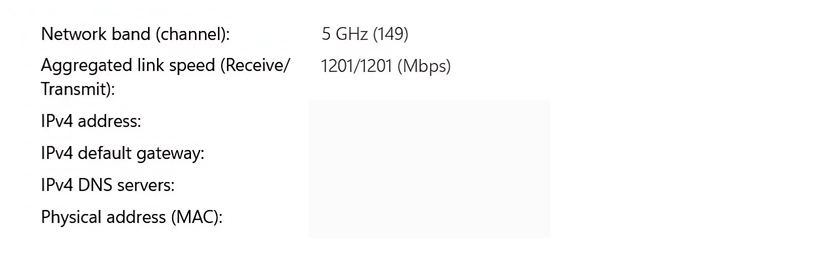
- Scroll down to see your DNS server. It should appear, in numerical form, next to IPv4 DNS servers.
Find your DNS server on Mac
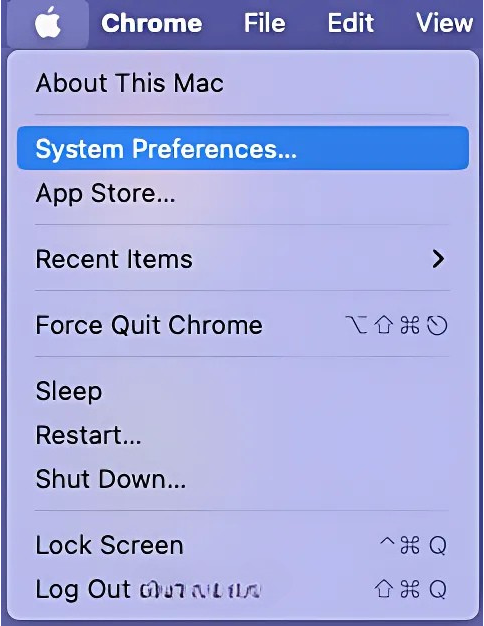
- Click on the Apple logo and go to System Settings/Preferences.
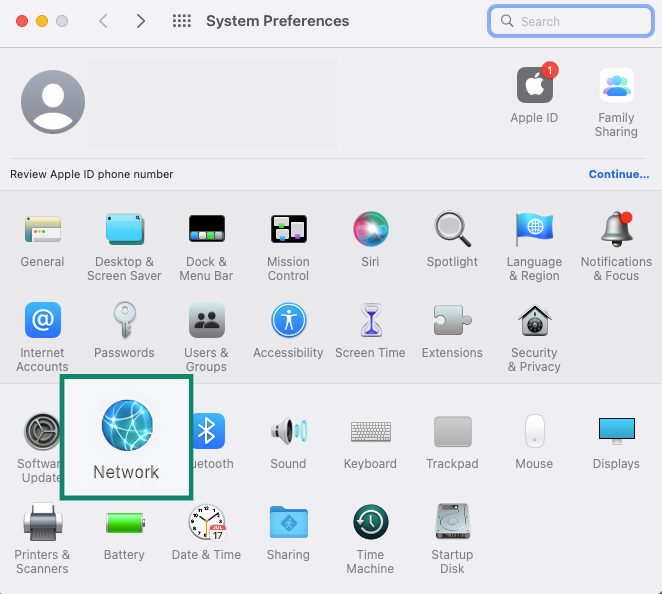
- Click on Network.
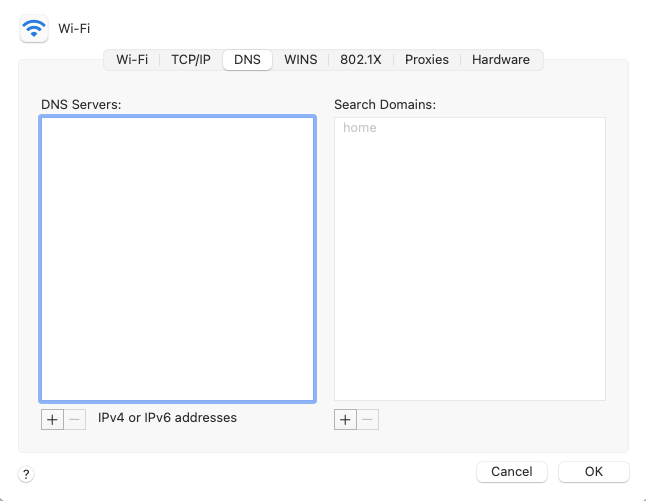
- Select your network service, then click Details/Advanced.
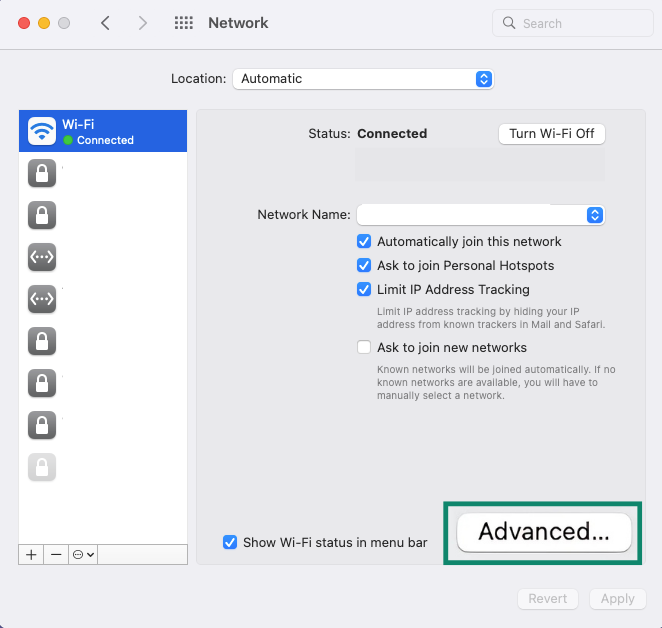
- Click on DNS and view your DNS details in the next window.
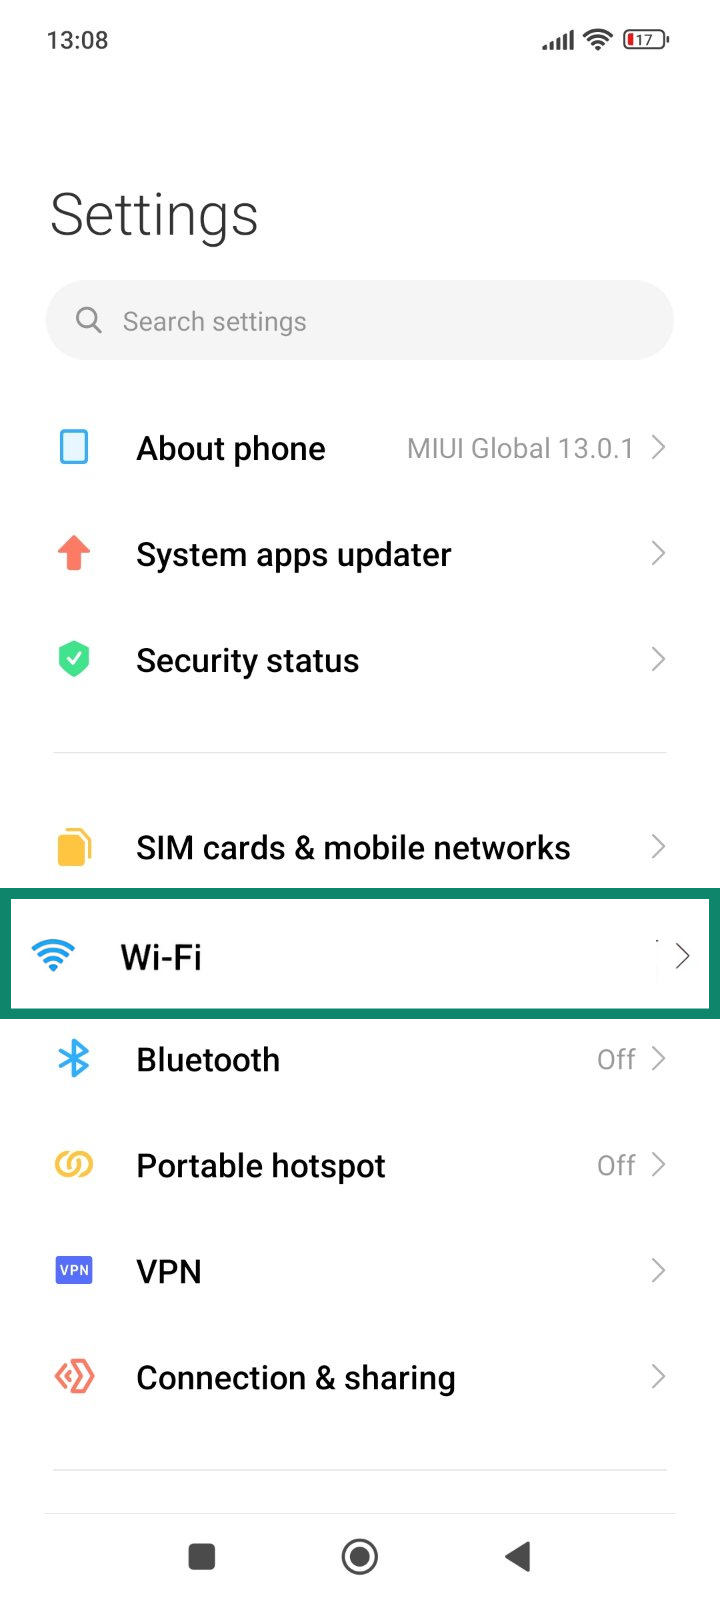
Find your DNS server on Android
- Open the Settings menu and find the Wi-Fi option.
- Long-press on the Wi-Fi connection you are currently connected to. On some models, you should tap on the Wi-Fi connection instead of long-pressing it.
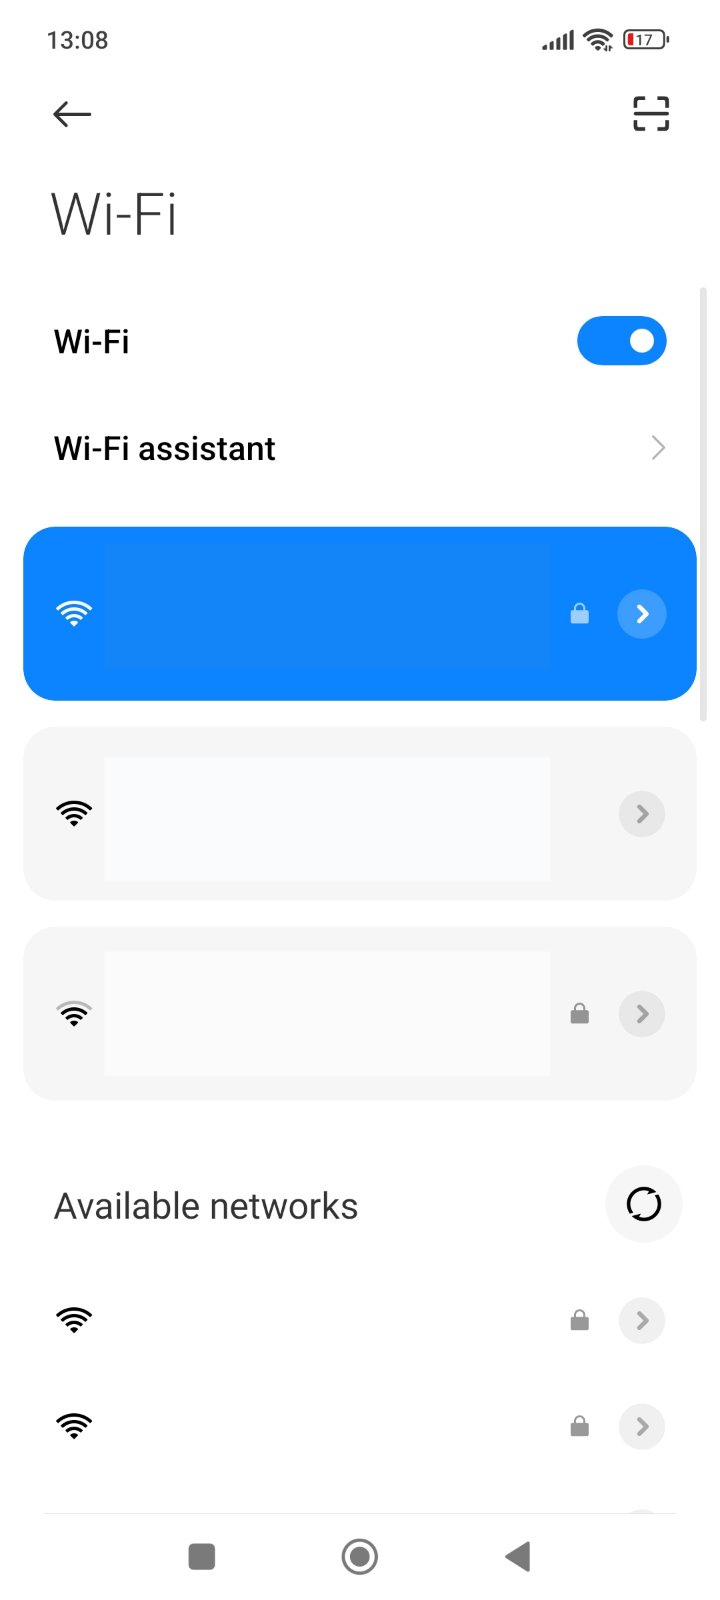
- Scroll down and tap IP settings.
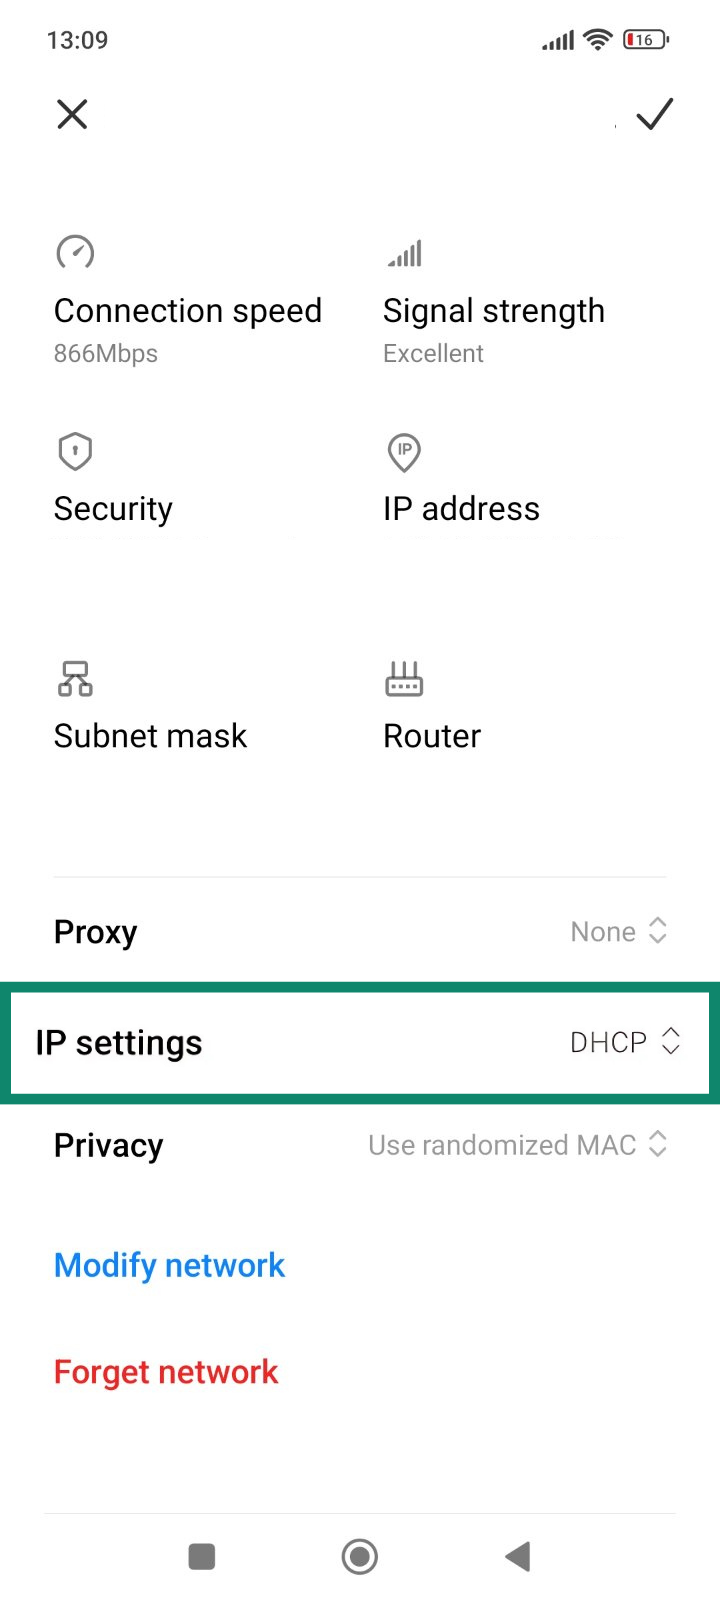
- You should now see a menu of network settings that you can freely change, including DNS servers. On some devices, you may also have to change your IP settings to “Static” before you can change the DNS details.

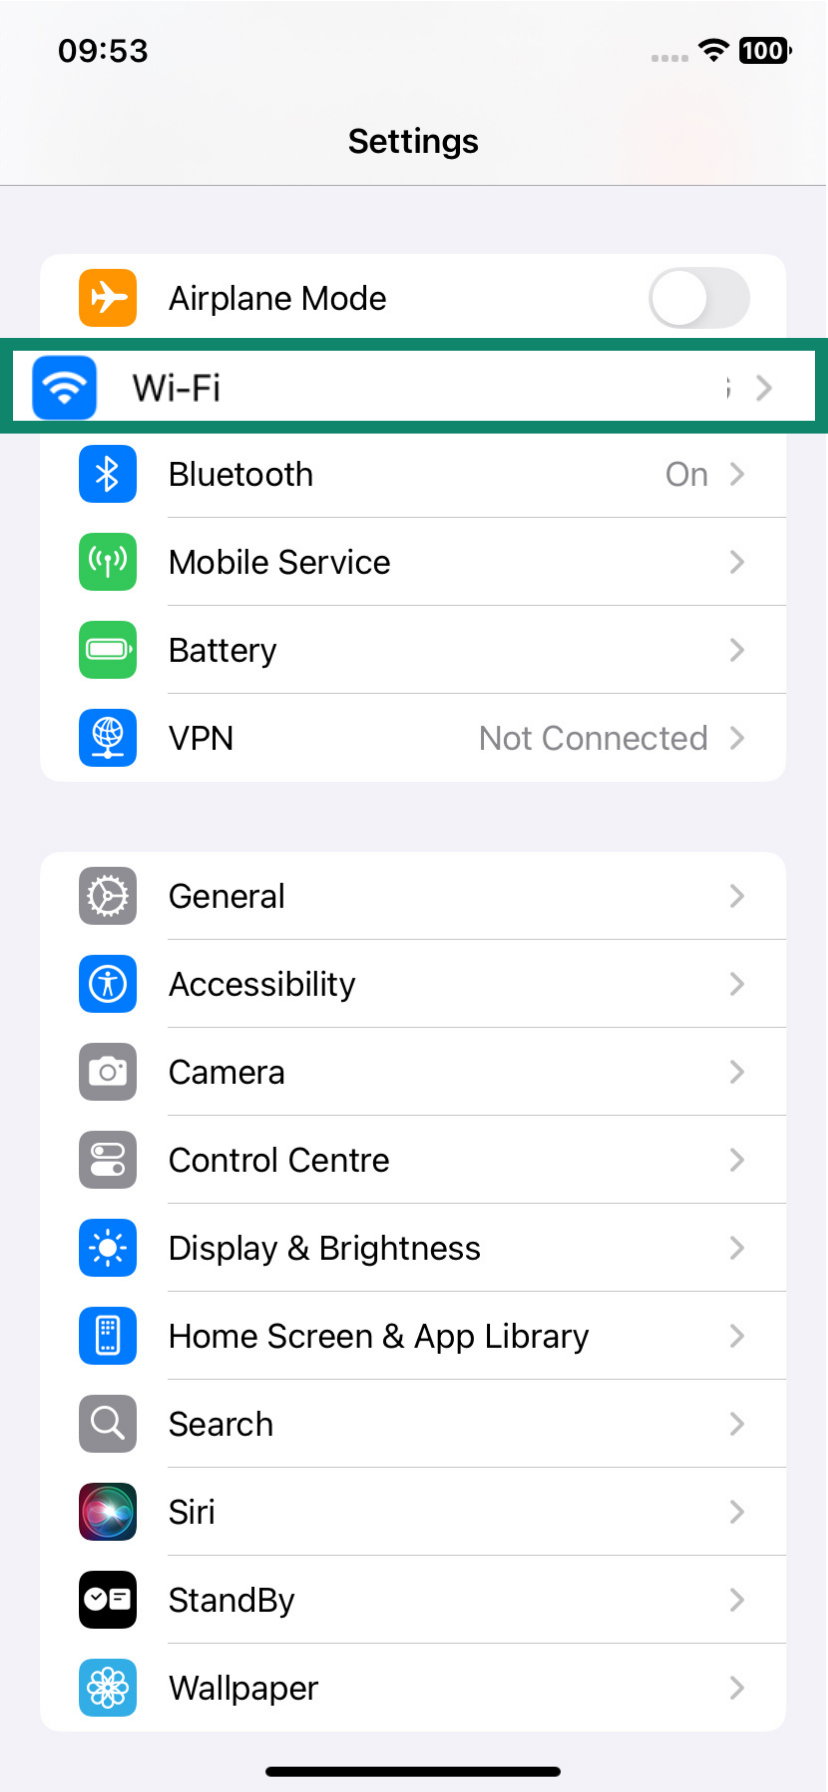
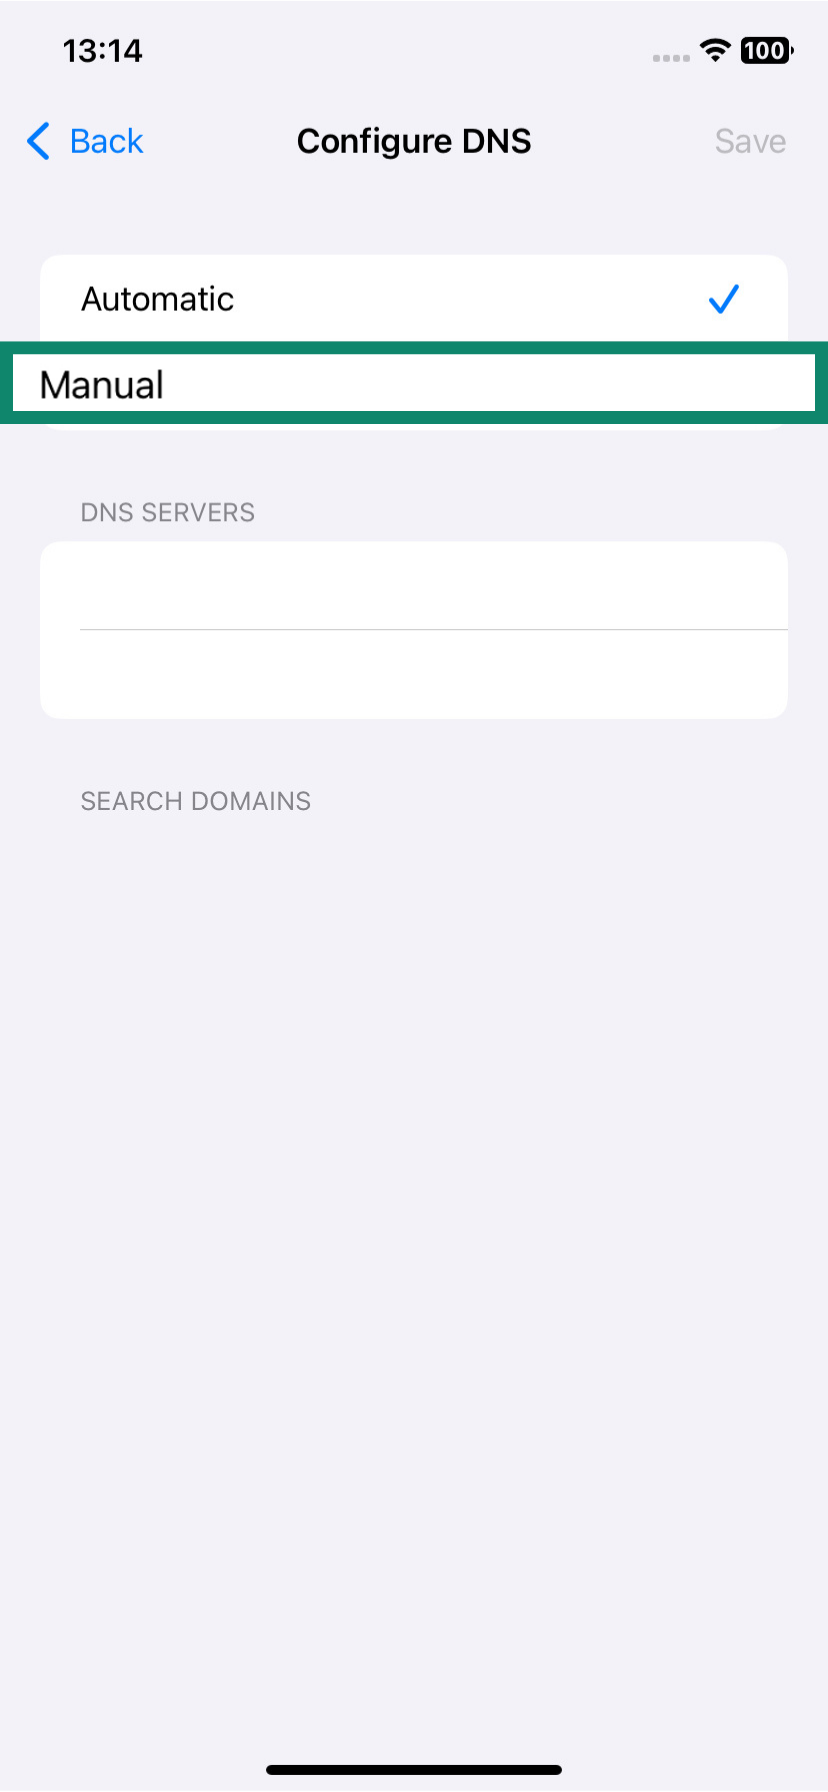
Find your DNS server on iOS
- Open the Settings menu and tap on Wi-Fi.
- Tap on the little i next to your current connection.
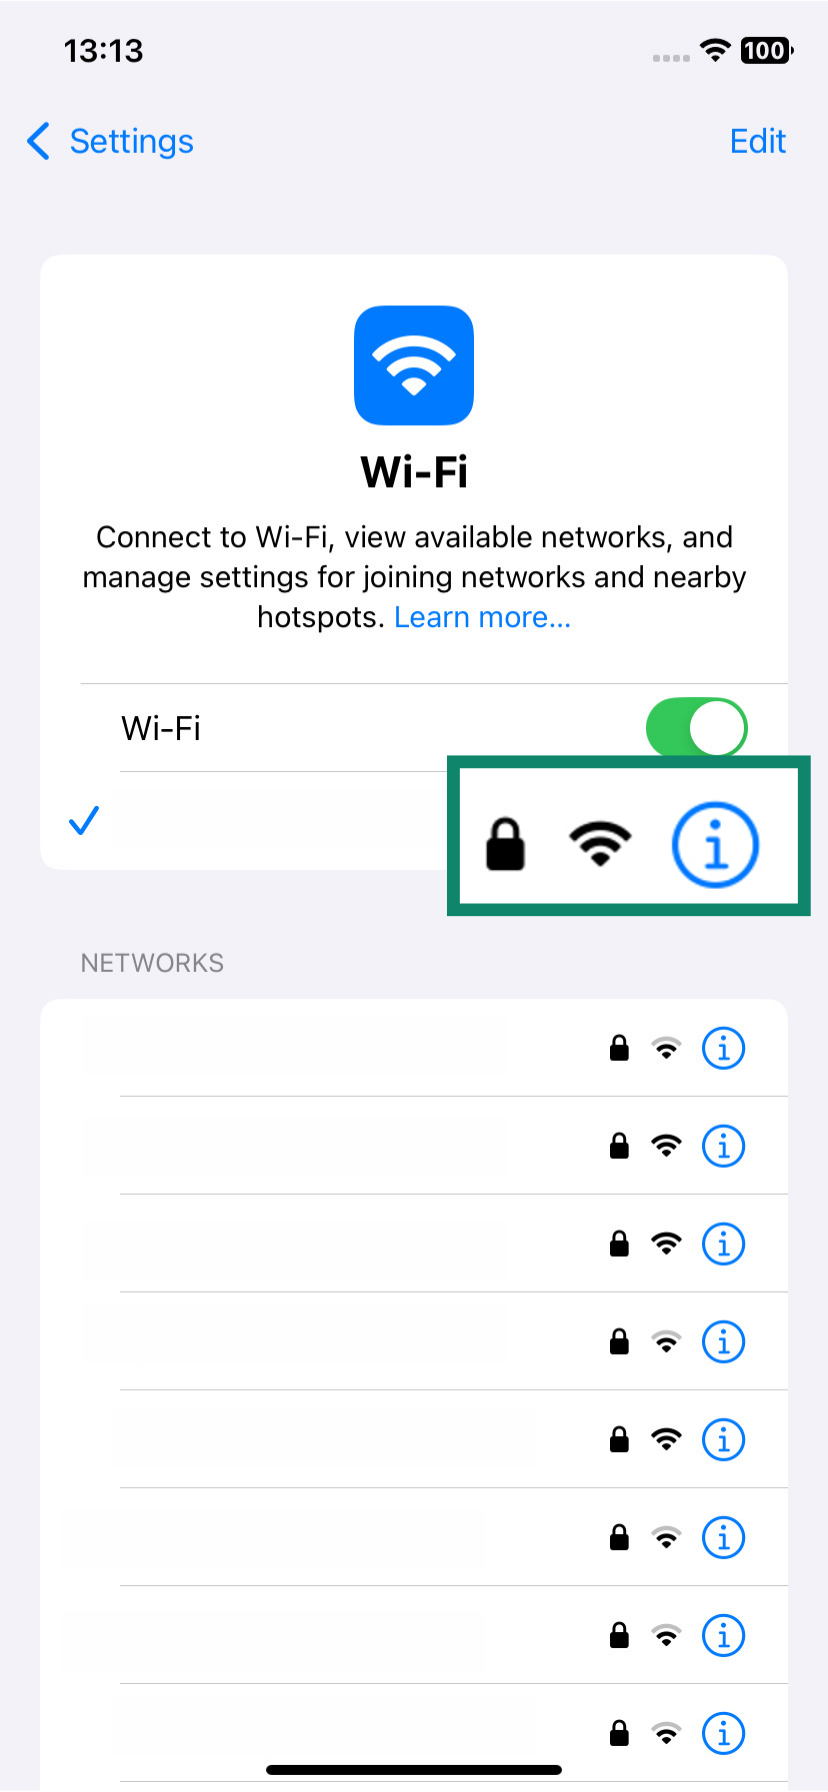
- Tap on Configure DNS.
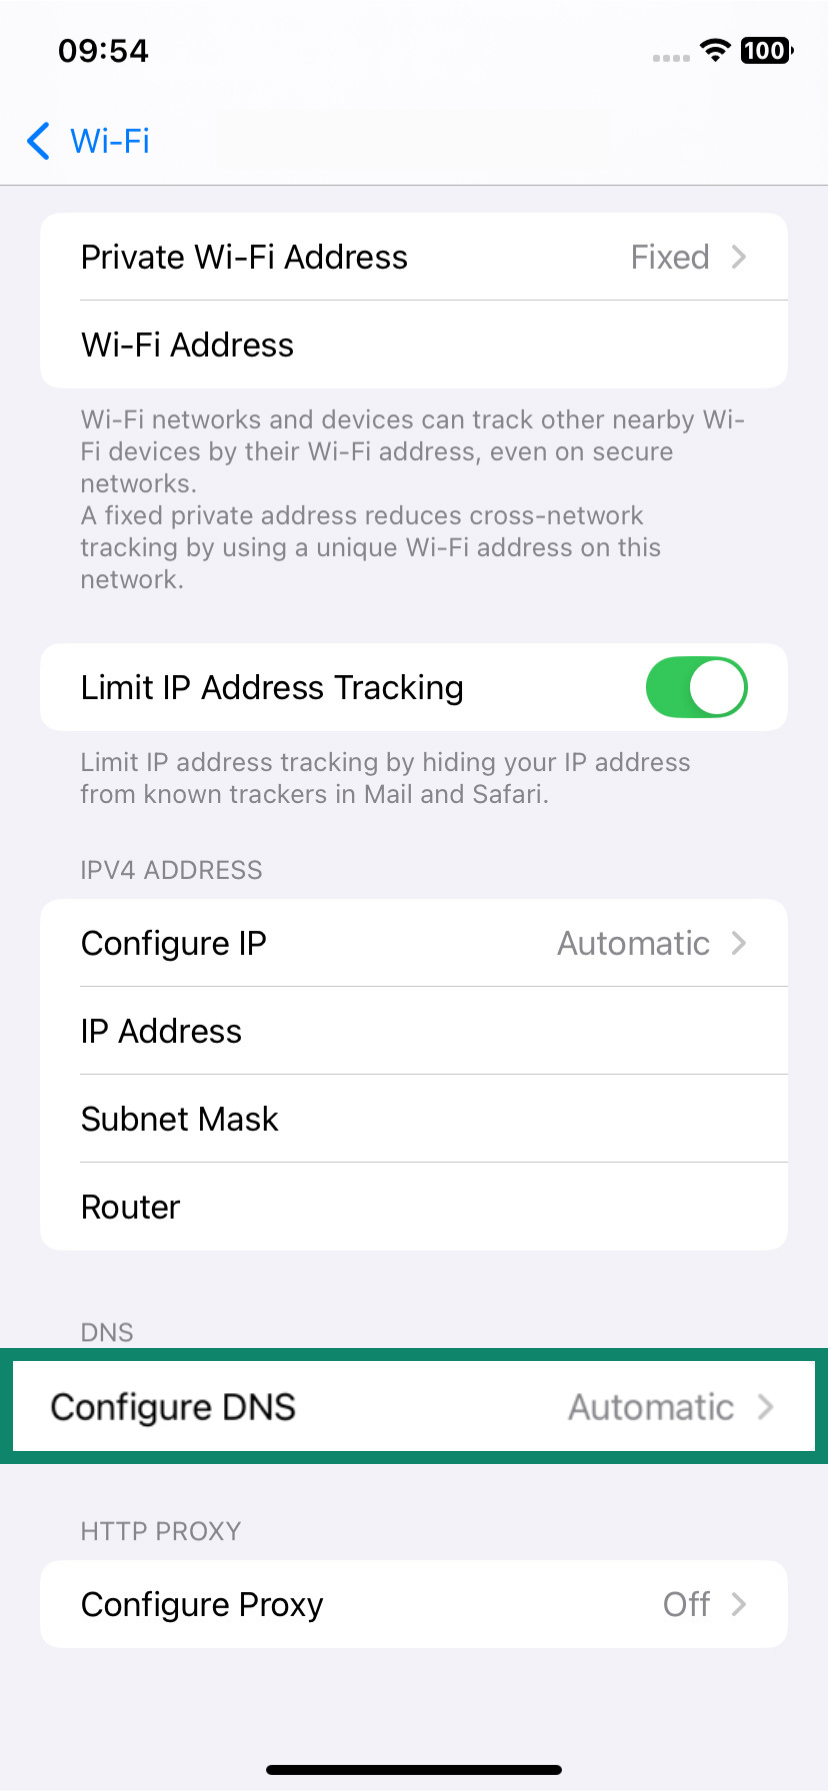
- Change your DNS settings to Manual. You can then tap on the DNS server boxes to modify them and enter your own server details.
How to find your DNS server on a router
- Access your router’s admin page by opening a web browser and entering the router IP address. You may also have to log in at this stage.
- Find the network settings or information page. This process will vary from router to router, but there are usually menus labeled Network or Connection.
- Find the section that displays your DNS server address.
How to find your DNS server using command line
-
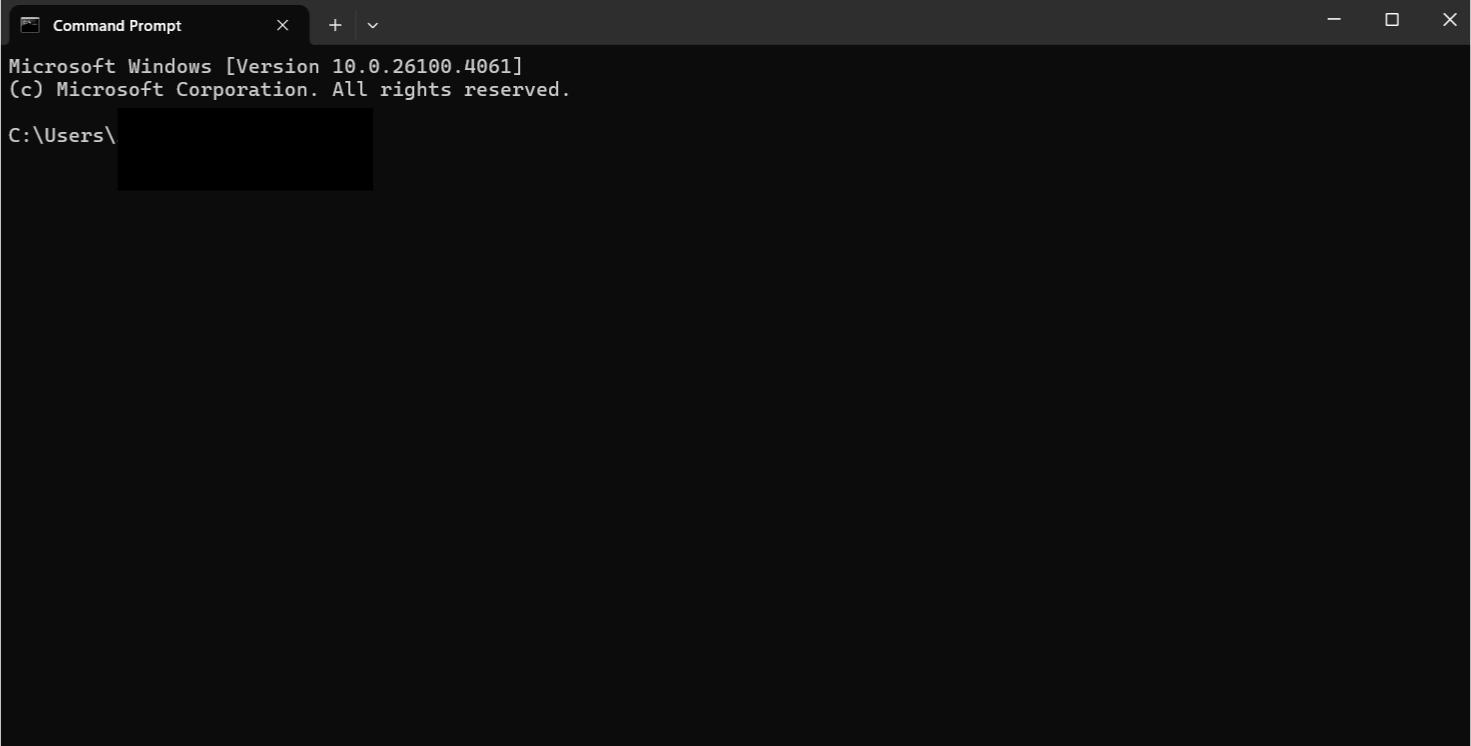
- Open the Command Prompt tool on your Windows machine. You can find it by simply searching for “CMD” in the search bar.
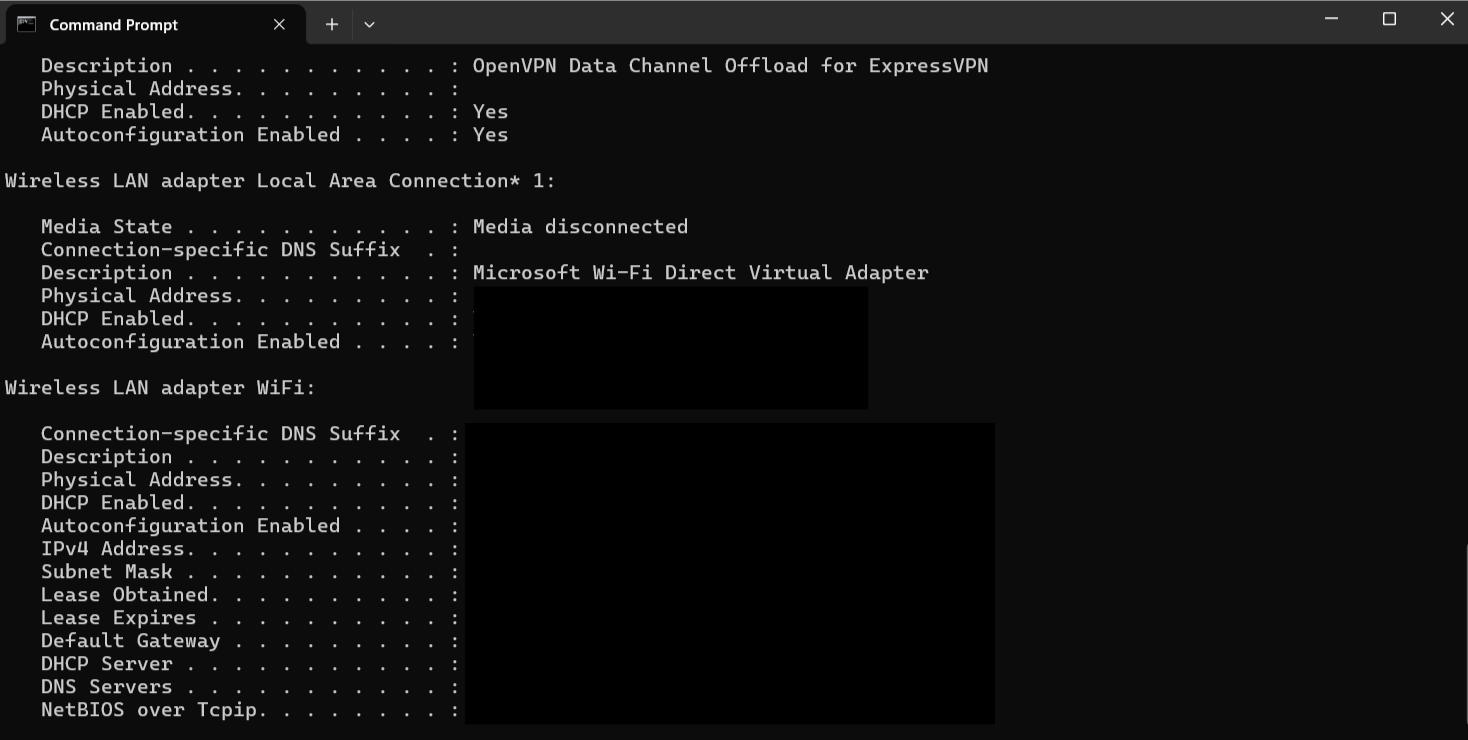
- Enter this command: ipconfig /all
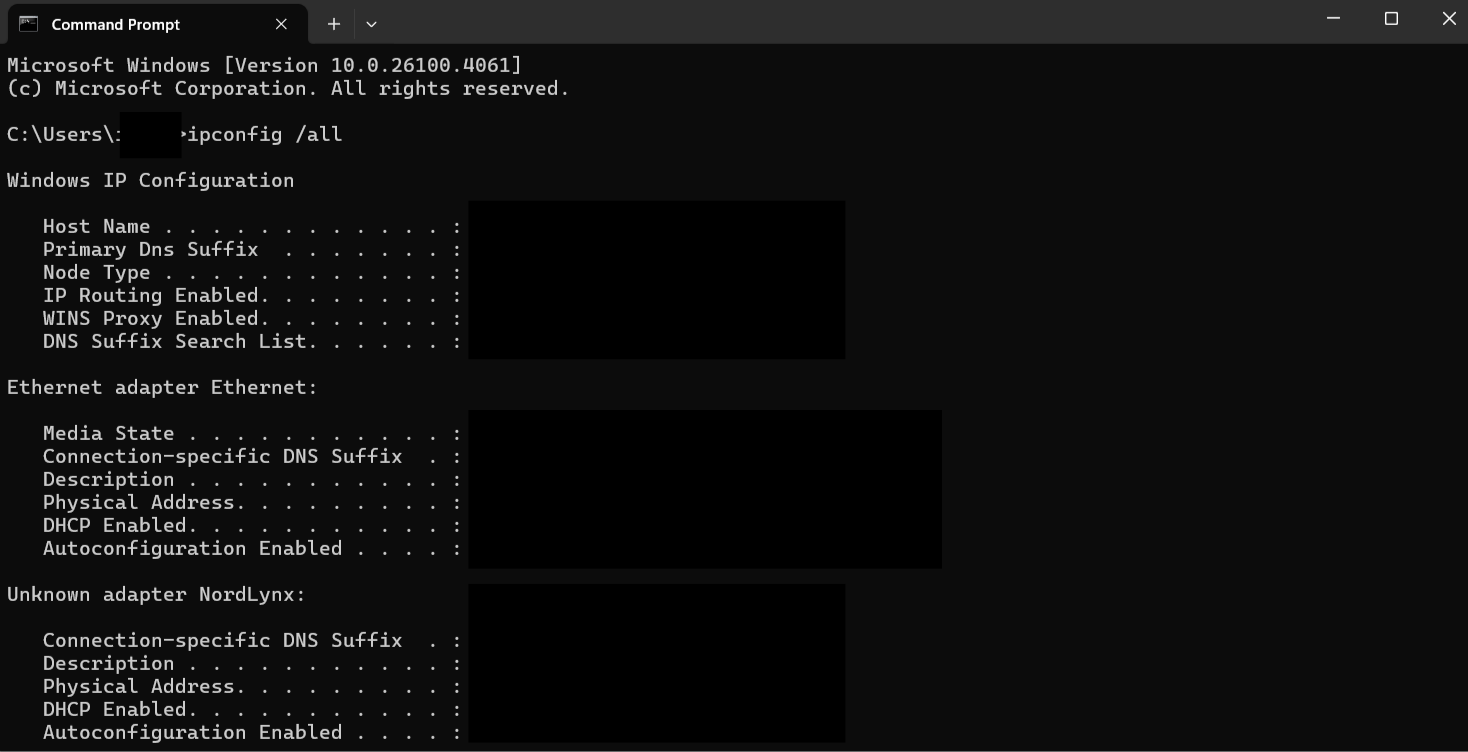
- Scroll down the results, and you should see your DNS server address clearly labeled.
- Open the Command Prompt tool on your Windows machine. You can find it by simply searching for “CMD” in the search bar.
How to check your DNS server using online tools
Apart from the above methods, which can help you find which DNS server you are connected to and some basic information about it, there are numerous online tools for finding out more about your DNS. Let’s take a look at some of the options available and how they work.
Best free online DNS checkers
There are a number of freely accessible online tools for checking your DNS server and running other kinds of DNS-based tests. Some examples include DNSChecker, WhatsMyDNS, and DNSLeakTest.
How to use a DNS checker to verify your DNS settings
- Choose a tool: As mentioned, some of the more popular ones include DNSChecker or WhatsMyDNS.
- Enter a domain name: These tools typically ask you to enter the domain you want to check (like example.com).
- Start the lookup: Hit Search or Check to begin the DNS lookup.
- Review the results: The tool will return the DNS records associated with the domain, showing the current server responses.
Why you might want to change your DNS settings
As well as checking your DNS settings at any time using the methods listed above, there are also ways you can change the DNS server on different platforms. This is quite a quick and easy process, for the most part, but you might be wondering why you’d even want to adjust DNS in the first place.
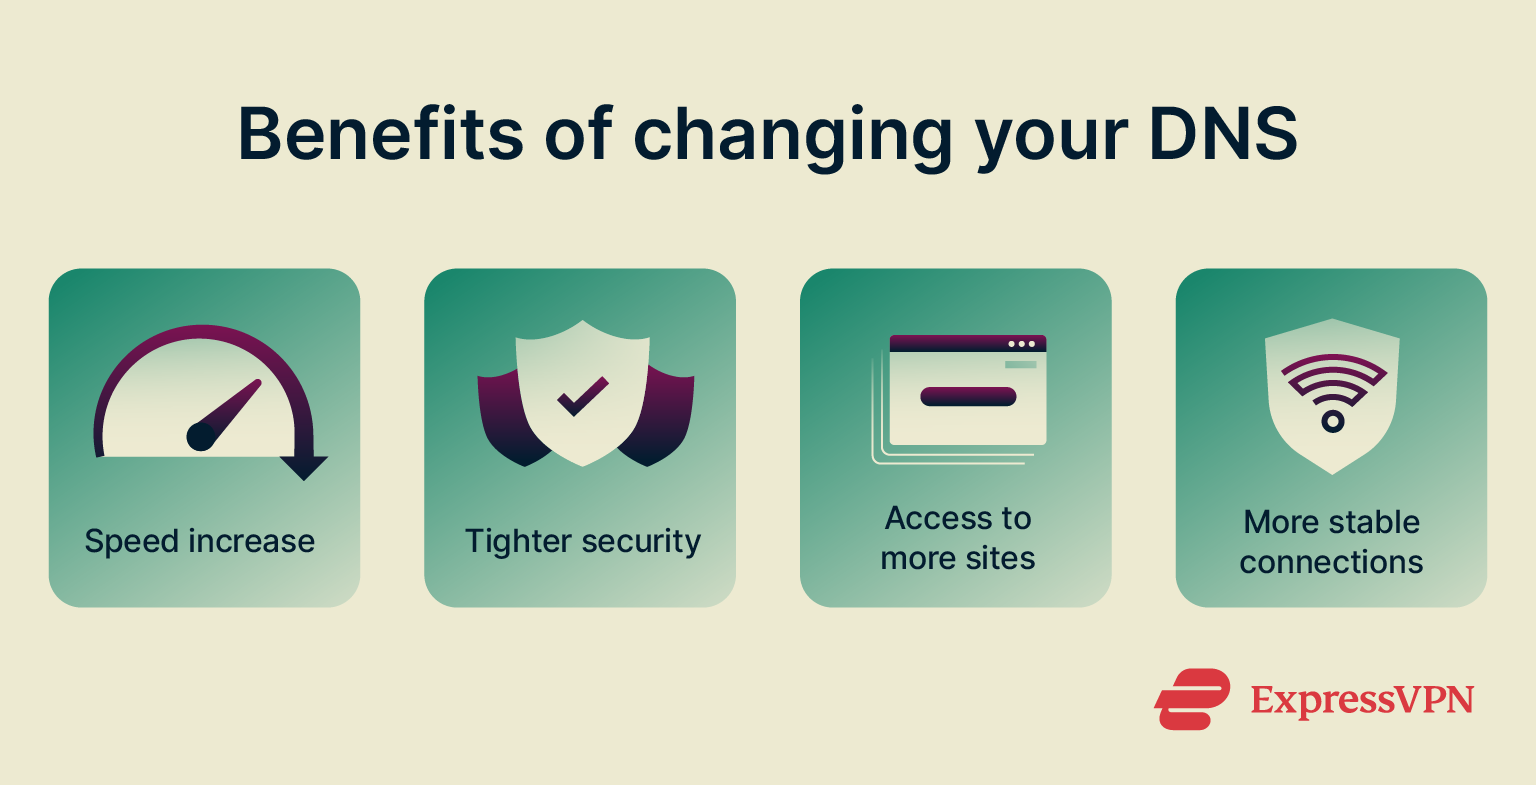
Benefits of changing your DNS
Changing your DNS server may provide a range of benefits, such as:
- Speed increase: You shouldn’t expect a huge speed increase if you change DNS. However, it can help pages load a little faster and minimize connection latency.
- Tighter security: Some DNS services provide enhanced security and privacy advantages, like malware filtering or data encryption, helping you avoid falling victim to DNS hijacking attacks, viruses, and dangerous websites.
- Access to more sites: Some DNS servers may restrict access to certain websites. Switching to a different DNS server has been known to solve this issue and restore access.
- More stable connections: DNS servers sometimes have technical issues, like slow response times or configuration problems. Switching over to a more stable and better-maintained DNS might help you enjoy a more reliable connection.
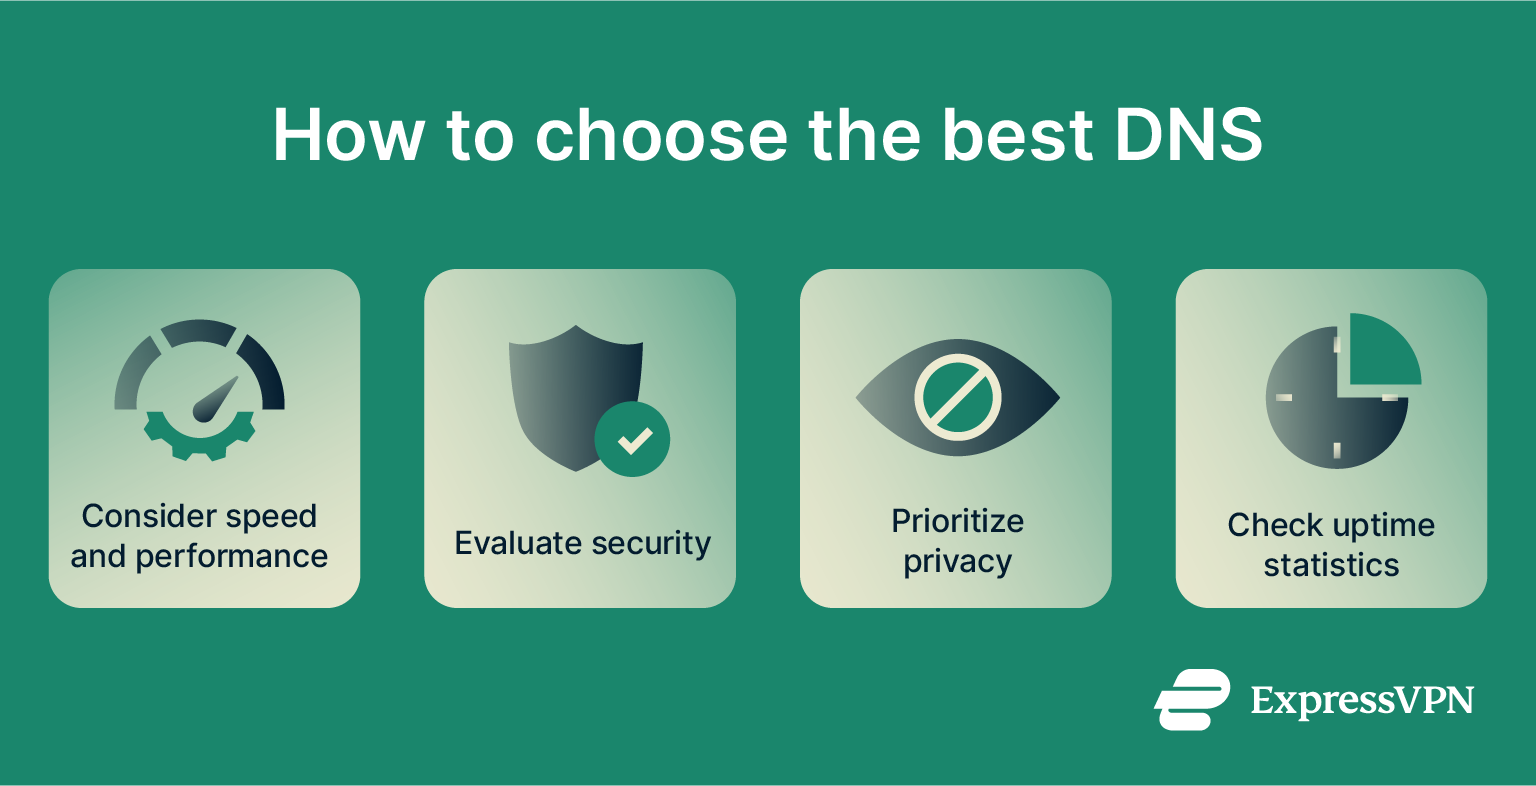
How to choose the best DNS server for your needs
Selecting the best DNS server for your needs depends on several factors, including speed, security, privacy, and reliability. Here’s how to make an informed choice:
- Consider speed and performance: A faster DNS server can reduce the time it takes to resolve domain names and load websites. While DNS resolution is generally fast, using a server closer to your location can enhance performance. Look for DNS servers with minimal response time for faster browsing.
- Evaluate security features: Some DNS servers offer added security, blocking access to malicious websites and providing protection against cyber threats like phishing, malware, or ransomware.
- Prioritize privacy: Your DNS queries reveal what websites you visit, so using a privacy-conscious DNS provider can protect your browsing habits from surveillance or data collection. Choose a provider that does not log your DNS queries or share data with third parties.
- Reliability and uptime: DNS servers should be consistently available and able to handle large volumes of queries. Look for DNS providers with proven reliability and uptime statistics, especially if you depend on your connection for work or business.
Public vs. private DNS: Which one should you use?
We can categorize DNS servers into two main groups: public and private. Public DNS servers are accessible to everyone using the internet, while private servers are much more restricted in terms of who can access and use them. For instance, businesses may use private DNS servers exclusively for their employees.
While generally fast and reliable, public DNS servers are more vulnerable to cyberattacks or issues like DNS leaks. Private DNS servers are the more secure, private option, since access to these servers is more strictly controlled. They also usually offer more control for advanced users to configure settings as they like. For example, ExpressVPN has its own private, encrypted DNS, which comes with many security benefits compared to public DNS, such as:
- Increased privacy: Your DNS requests are shielded from third parties, including public Wi-Fi operators, hackers, and marketers.
- No logs: ExpressVPN doesn’t store any logs of your DNS queries.
- Strong encryption: Your DNS requests, as well as your overall internet traffic, are encrypted using 256-bit AES, an extremely secure encryption standard.
- No DNS blocking: ExpressVPN does not restrict your ability to access sites in any way.
For website owners: DNS propagation
DNS propagation is the process of updating DNS records on the many DNS servers around the world. Website owners change their DNS to update their website’s server location, switch hosting providers, improve security, or optimize performance, ensuring that users can access the site quickly and securely. When an individual site’s DNS information gets updated, all of the different servers that make up the global DNS will need to receive that new information and rectify their records accordingly so that future requests go to the right address.
How long does DNS propagation take?
DNS propagation is not an instant process. It takes time for all the many server records to update. The total time varies. In some cases, the process might be done in mere minutes. In others, it could take up to several days. It depends on several factors, such as the specific DNS settings for the site in question.
How to speed up DNS propagation?
A common technique for site owners to boost DNS propagation is to reduce your site’s time to live (TTL) via your DNS settings in the days leading up to any big DNS changes. With a shorter TTL, your old DNS records will expire more quickly to be replaced with new ones.
What to do if DNS propagation is stuck
If your domain’s DNS records simply refuse to update, even after waiting a few days for propagation, you may have to resort to flushing your DNS cache or getting in touch with your registrar for assistance.
FAQ: Common questions about DNS
What is a DNS lookup?
What is DNS propagation?
How do I find out what my DNS provider is?
Can changing my DNS improve internet speed?
Is 8.8.8.8 the fastest DNS?
Is 192.168.1.1 a DNS server?
Take the first step to protect yourself online. Try ExpressVPN risk-free.
Get ExpressVPN